Cake 09/03/2025 00:20

Brownie Refrigerator Cake: A Decadent, No-Bake Treat 🍰🍫✨

If you're a fan of rich chocolate and creamy textures, this Brownie Refrigerator Cake is the ultimate dessert for you! Combining boxed brownie mix, cream cheese, whipped topping, and instant pudding, this no-bake masterpiece delivers all the indulgence of a classic cake without turning on the oven. Perfect for parties, holidays, or simply treating yourself, it’s easy to make and utterly satisfying.


Let’s dive into how to create this delightful recipe step by step!


Why This Recipe Is So Irresistible

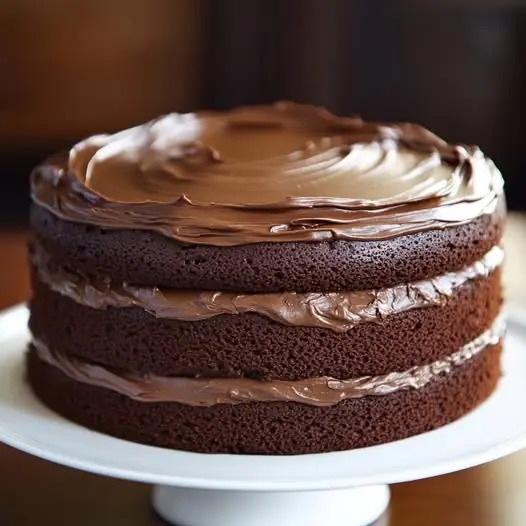
This brownie refrigerator cake isn’t just another dessert—it’s pure chocolatey magic:

 
  • No-Bake Delight : Skip the hassle of baking while still enjoying a decadent cake-like treat.
  • Rich & Creamy : Layers of cream cheese frosting, chocolate pudding, and whipped topping create irresistible textures.
  • Quick & Easy : Ready in under 30 minutes (plus chilling time), it fits perfectly into busy schedules.
  • Customizable : Add sprinkles, nuts, or extra chocolate shavings for added flair.
 

Whether served at family gatherings or enjoyed casually at home, this cake promises to delight every sweet tooth.


Ingredients You’ll Need

  • 1 box brownie mix (plus ingredients required on the box)
  • 1 package (8 oz) cream cheese , softened
  • 1 cup powdered sugar
  • 1 tub (8 oz) whipped topping (Cool Whip) , thawed, divided
  • 2 boxes (3.9 oz each) chocolate instant pudding mix
  • 3 cups cold milk
  • Chocolate shavings or curls , for garnish

1. Prepare the Brownies

Follow the instructions on the brownie mix box to bake the brownies as directed. Once baked, let them cool completely before cutting into small squares or cubes.


Pro Tip: For easier assembly, chill the brownies after cooling to firm them up slightly.


2. Make the Cream Cheese Frosting

In a mixing bowl, beat the softened cream cheese and powdered sugar together until smooth and creamy. Set aside.


3. Prepare the Chocolate Pudding

In a separate large mixing bowl, whisk together the two boxes of chocolate instant pudding mix and cold milk according to package instructions. Let the pudding sit for 5 minutes to thicken, then stir gently until smooth.


4. Assemble the Cake

In a trifle dish or large glass bowl, begin layering the cake:

  • Spread a thin layer of whipped topping on the bottom of the dish for stability.
  • Add a layer of brownie cubes, ensuring they’re evenly distributed.
  • Spread half of the chocolate pudding over the brownies.
  • Dollop half of the cream cheese frosting over the pudding, spreading it out gently with a spatula.
  • Repeat layers: whipped topping, brownies, pudding, and cream cheese frosting.
 

Finish with a final layer of whipped topping, smoothing it out with a spatula.


5. Garnish and Chill

Sprinkle chocolate shavings or curls generously over the top of the cake for added elegance. Cover the dish tightly with plastic wrap and refrigerate for at least 4 hours , or overnight, to allow the flavors to meld and the cake to set.


6. Serve and Enjoy

Slice the refrigerator cake into portions and serve chilled. Pair with fresh berries, ice cream, or additional chocolate sauce for extra indulgence.


Tips for Success

  • Use High-Quality Brownie Mix : Premium mixes enhance the overall flavor of the cake.
  • Don’t Overfill the Dish : Leave enough space between layers to prevent squishing.
  • Make It Ahead : Prepare the cake up to a day in advance for deeper flavors and easier serving.
  • Experiment with Toppings : Drizzle melted chocolate, sprinkle crushed cookies, or add fresh fruit for variety.


Conclusion

This Brownie Refrigerator Cake is more than just dessert—it’s a celebration of convenience and chocolatey goodness. With its tender brownie base, creamy pudding layers, and customizable options, it’s guaranteed to become a favorite in your household.


So gather your ingredients, roll up your sleeves, and get ready to savor this delightful creation! Don’t forget to share your results with us in the comments below—we’d love to see how they turned out.


If you enjoyed this recipe, check out our other articles for more dessert inspiration and easy baking ideas. Happy baking, and remember—life’s too short not to enjoy something sweet now and then! 🍴✨

News in the same category

News Post