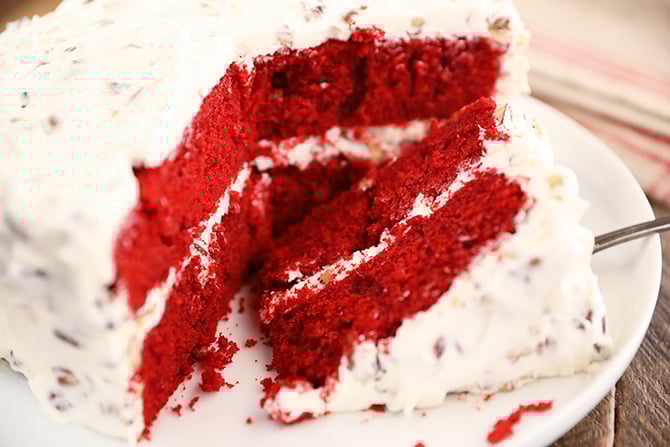
Best Red Velvet Cake – Vibrant-Crimson Sponge with a High-Gloss Ruby Mirror
The Best Red Velvet Cake is a visual icon of "Passionate Contrast." Its aesthetic power is rooted in the **"Ruby-on-Snow"** effect—the striking contrast between the **vibrant-crimson internal crumb** and the **reflective, snow-white exterior**. In 2026, it remains a top-tier "Heavy Pour" dish because the buttermilk-acidified sponge provides a dense, matte canvas that allows the high-gloss berry glaze to reflect studio lights with extreme "Vibrant-Red" clarity.
The dish is defined by the "Vinegar-Cacao-Reaction" technique, creating the signature vibrant-crimson hue, and the "Pomegranate-Emulsion" that provides a high-gloss, mirror-like finish. -------------------------------- Ingredients (Serves 8-12)
- 2 1/2 cups All-purpose Flour & 2 tablespoons Cacao Powder (for "Vibrant-Dark" depth) - 1 1/2 cups Buttermilk & 1 teaspoon White Vinegar (the "Vibrant-Crimson" secret) - 2 cups Sugar & 2 Large Eggs - 1 tablespoon Red Food Gel (high-quality for "Neon-Crimson" intensity)
For the "Mirror" Ruby Pour (The Star) - 1 cup Pomegranate Juice (strained for "Ink-Dark" ruby) - 1/4 cup Light Corn Syrup (the secret for "High-Gloss" reflection) - 1 teaspoon Gelatin (bloomed for "2026 Mirror" gloss) - 1 drop Red Food Gel (to lock in the "Vibrant-Ruby" pop)
Step 1 – The "Crimson" Prep Whisk buttermilk, vinegar, and red gel. This chemical reaction is the only way to achieve a "Vibrant-Crimson" crumb that doesn't turn "muddy" brown in the oven.
Step 2 – The Velvet Bake Fold in flour and cacao. Bake at 175°C (350°F) until the surface is "Matte-Crimson." The sponge must be dense and "Liquid-Silk" smooth to hold the heavy frosting layers. Step 3 – The Snow-White Silk Whisk cream cheese and heavy cream until "Snow-White" and stiff. Pipe thick, "Strict-Geometric" layers between the sponges to maximize the color contrast.
Step 4 – The Crumb Coat Cover the entire cake in a flawless "Snow-White" layer. Chill until rock hard. This is the mandatory "Reflector" base for the ruby pour.
Step 5 – Build the Ruby Silk Heat pomegranate juice and corn syrup. Whisk in bloomed gelatin. The corn syrup is the "secret weapon" for a high-gloss finish that reflects light like liquid gemstone.
Step 6 – Achieve the Gloss Whisk the glaze in small circles. This is the only way to achieve a "Lava-like" emulsion that is "Crystal-Clear" and ruby-red.
Step 7 – The Sieve Sift Pass the glaze through a fine-mesh sieve. This is mandatory for a "Liquid-Silk" look—no air bubbles should break the mirror surface during the pour.
Step 8 – The Arrangement Place the chilled cake on a dark slate board to make the "Snow-White" and "Vibrant-Ruby" tones explode.
Step 9 – The Heavy Pour (The Money Shot) Slowly pour the warm, shimmering Ruby Mirror directly over the center of the cake, letting it cascade down the snow-white sides in a thick, translucent curtain. Step 10 – The Final Reveal Capture the moment the ruby liquid "beads" on the white frosting, creating a high-contrast visual of crimson against snow.
-------------------------------- Pro Tips Using "Buttermilk and Vinegar" (Step 1) is mandatory; without the acid, the red color will oxidize and look "grey" on camera. The "Pomegranate Juice" (Step 5) is the secret to a 2026 "Mirror" ruby; it provides a deeper, more "Natural-Luxury" red than plain water and food coloring. Always slice with a hot, wet knife (Step 10); this reveals the "Vibrant-Crimson" interior with a "Clean-Snap" edge that hasn't been muddied by the frosting.
-------------------------------- Why This Performs High-gloss "Ruby Mirror" glaze visual. Vibrant Crimson vs. Snow-White color contrast. Shattered-crumb "Velvet" texture. Extreme "Satisfying" vertical-pour and geometric-slice appeal.